
 Tire Temperatures
Alignments
There is nothing that says that all four wheels on a car must be pointed perfectly straight ahead and at right angles to the road surface. Indeed, most cars provide for some degree of adjustment of which direction the wheels are pointed, relative to the chassis, at rest. Adjusting these values is called aligning the car and the final configuration is referred to as an alignment.
The three major alignment parameters are:
- The Camber Angle,
- The Caster Angle, and
- Toe (expressed either as an angle or as a linear distance).
Camber
Camber is the degree to which the top of the tire is tilted in/out as seen from ahead or behind
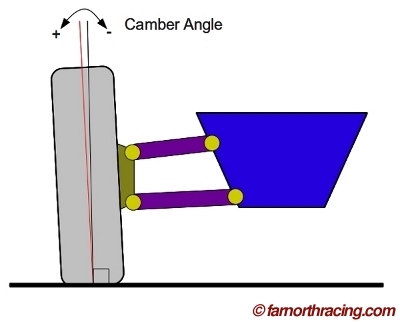
By convention, when the top of the tire is further away from the chassis than the bottom, the camber angle is considered positive, and when the top of the tire is closer to the chassis than the bottom, the camber angle is considered negative.
All things considered, we'd rather have no camber angle on the tire at all. Maximum grip typically occurs when the tire is loaded equally across the surface of the contact patch, and that requires that the tire be as normal to the road surface as possible. The problem that we face is that as the suspension pivots through its range of motion, it describes an arc, and that means that the camber angle (reference the chassis) is going to change as the suspension is compressed or extended.
Most problematically, the suspension is going to be compressed as the chassis rolls in response to cornering forces. As the chassis rolls around, not only is it going to compress the outboard suspension and extend the inboard (due to weight transfer), the suspension pivot points are going to get dragged around as well, with the result that the camber angle (both with respect to the road surface and the chassis) is going to change.
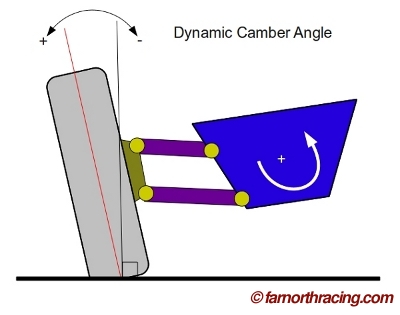
These camber changes cannot be eliminated short of moving to a live axle (which has other problems) but if the car designer is particularly clever, he can locate the pivot points on the chassis and the lengths and angles of the suspension links such that the arc transcribed by the wheel hub (relative to the chassis) tends to counteract the chassis roll trying to push the camber angle increasingly positive (with respect to the road surface), with the result that the dynamic camber angle (the camber angle with respect to the road surface at any given instant) stays more-or-less constant.
No suspension can completely eliminate dynamic camber change. Good ones provide a "dead band" in which dynamic camber doesn't move much for a portion of the suspension's range of motion, and the static ride height is set to split the dead band so that a rolling and unrolling chassis doesn't change the dynamic camber angle.
Double-A-Arm suspensions can do a very good job of this (the C5 Corvette is particularly good). MacPhearson struts are particularly poor.
Given that most of us are incapable of changing the type of suspension on the car (through either rules or resources) the questions then become:
- How much is the chassis going to roll at full cornering?
- What is the resultant change in camber angle at full cornering?
- What static camber angle must be on the car such that the wheel is upright at full roll?
There is a fourth question - At what camber angle do my tires produce maximum grip? Normally we'd expect that it would be at a camber angle of zero degrees, but tire manufacturers can also be clever, and at least one model of tire (the BFG R1 circa the late 1990s) was designed to produce maximum grip at slightly positive camber angles - designed so on purpose to deal with camber-challenged production-based cars in Stock classes. Be sure to test different dynamic camber angles to see which value your tires like best!
The best way to answer the first two questions is to measure and model the suspension using a program like WinGeo, and then confirm the calculated values through logging the suspension position sensors (and ideally, playing the values back through WinGeo!) Working out the roll angle at full cornering turns out to be surprisingly tricky, as weight transfer (and resultant roll) has multiple components to it. Calculating weight transfer and resultant roll will be shown in a later chapter.
Once you know the amount of dynamic camber change at full roll, you set the static camber angle to compensate such that the tire is upright at full roll. For a double-A-arm, this may be a degree or two of negative camber. For a MacStrut, it is likely to be as much static negative camber as your suspension allows.
At very large values of static camber, the amount of grip in a straight line will start to be reduced, as the contact patch is not loaded evenly across its surface. This is generally not a big deal under braking, but it can be a very big deal under acceleration for the drive wheels, particularly for nose-heavy FWD cars. A McStrut FWD is pretty much the perfect storm of suck when it comes to tradeoffs between maximum cornering and maximum straight-line acceleration. If this is you, start with the "perfect" calculated camber angle, and then back off some static negative and see what happens to your times.
You will occasionally find proponents of setting camber angles through tire temperatures, tire wear patterns, and the like. That can work - eventually - but you'll spend a lot of time on cut-and-try and tire wear on wonky camber angles can occasionally eat tires. Using the measure-and-model approach gets you to the proper camber angle almost immediately. It also allows you to work out the ideal camber angle for reduced-grip surfaces (where less maximum cornering G means less weight transfer/roll and so less camber change) within seconds of the first run by recording the max G value and max roll angle and running those numbers through your model.
Your suspension model is your best friend. Done correctly, it will shed all sorts of light on setup information that must otherwise be gleaned through cut-and-try.
Caster
Caster is the inclination of the steering axis and so only affects the front wheels. Caster's primary effect is the amount of self-returning force on the steering wheel (more caster equals more return force). More return force means more feedback for the driver, so increasing caster is usually a good thing. The exception is for manual-steering cars, especially if they run high slip-angle bias ply tires (like late 80s VWs) where steering effort and required travel can get so high as to require Popeye as a driver.
High caster values also add negative camber at large steer angles which is generally positive.
Caster is not an alignment angle that pays much in the way of dividends. More is typically better (to a point) but the difference is fairly slight. A McStrut car can usually add some extra caster fairly simply; most other designs require some work to build it in. I consider this a "nice to have", not a "must have" like camber is.
Toe
Before we can discuss toe, we need to introduce another concept of how a tire works.
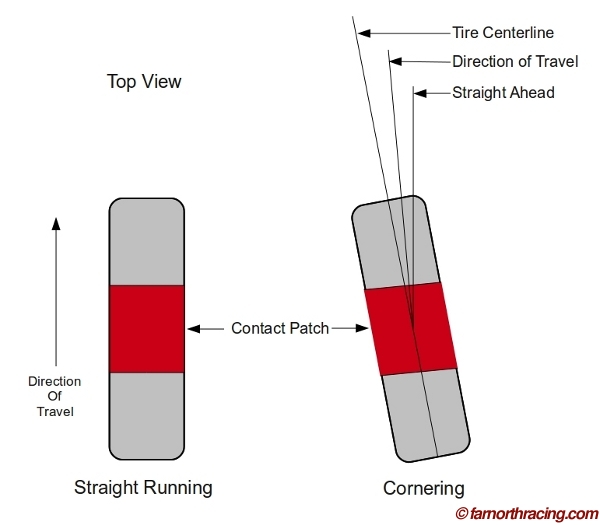
Consider a tire rolling straight ahead. The tread surface is constantly rolling through the contact patch, where it is squished by the load on the tire. Assuming this isn't a driven wheel and we are doing no braking, all the tire is doing is supporting the vertical load placed on it.
As soon as we start cornering, we start distorting the tire at the contact patch. The tire is to some degree being twisted, and because it is elastic, an angle develops between the direction the tire is pointed and the direction the tire is actually travelling. This angle, for historical reasons, it called the slip angle even though it is very important to realize that there is no "slipping" going on.
Both front and rear tires develop slip angles - indeed, no cornering can take place unless a slip angle has developed. The front tires develop slip angles by virtue of being steered, and the rears develop slip angles through being twisted through the chassis once the fronts start cornering. Because of this, there is always a measure of lag between the front and rear wheels as the fronts start cornering first and then the rears.
For a typical tire, cornering force increases with increasing slip angle - up to a point. Eventually, the contact patch reaches its limit of elasticity and portions of the contact patch start breaking loose and sliding. Eventually, the whole contact patch breaks loose and now the whole tire is sliding. For two points on either side of the slip angle vs cornering force "hump" the point with the smaller slip angle is much easier on the tire. The point with the larger slip angle is scubbing a portion of the contact patch against the road surface and wear and induced heating are way up. Happily, the driver can feel the slip angle curve as the self-aligning torque pulling back on the wheel follows a similar curve as the slip angle grip curve. A good driver can "ride the top" of the slip angle curve by feeling the self-aligning torque rise and fall as he changes the steering angle.
A soft-sidewall, "mushy" tire (like a tall sidewall bias ply) will typically support a much higher slip angle than will a stiff sidewall, low aspect ratio radial. The direct consequence is that the radial will transition much more crisply as it takes less steer angle to build to the slip angle/grip peak.

Toe is a measure of where the tires are pointed at zero steer angle. A car with toe in has the front of the tires pointed at each other to some degree, and a car with toe out has the front of the tires pointed away from each other.
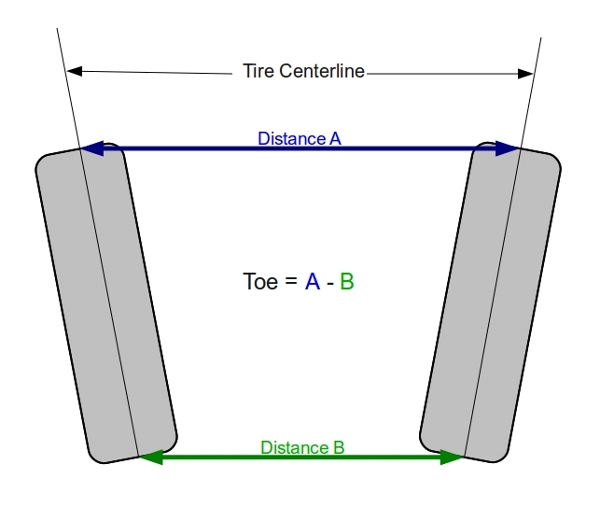
Toe can either be measured in degrees (as a sum of the heading of each wheel) or as a distance (per the diagram). Note that toe-as-distance is easier to measure, but only works for tires of similar diameter. If you routinely change tire diameter, the measured toe spec will change even though the actual amount of toe remains constant.
From a racing perspective, Toe Out is very interesting, because it allows us to start building slip angle in the tires before the actual corner starts, and that allows us to generate more grip on turn-in than we'd normally be able to do otherwise.
Let's examine a car with no toe in it (wheels pointed straight forward). As the car proceeds down the straight, there are no slip angles on any of the tires. As the driver turns the steering wheel, the front wheels pivot to the steering angle and slip angles start to build up on the front tires. This provides a cornering force on the front end of the car, and as the car starts to turn, the twisting force (in yaw) starts to turn the rear tires as well, so slip angles start building on the rear tires. Simultaneously, as cornering forces build, weight starts transferring away from the inside tires onto the outside tires - meaning that what is going on on the outside tires has more influence than the inside tires.
On a car with toe out, you now have small slip angles built up on all four tires. These slip angles are opposite to each other, so in a straight line, there is no effect other than to slightly scrub off some speed compared to the zero-toe car.
But on turn-in, the inside tire already has a slip angle formed in the right direction, and as steer angle is fed in, the outside tire's "wrong-way" slip angle is being reduced. The slip angle on the inside tire is getting larger, and as we saw from the graph earlier, more slip angle means more grip. There is a tire dependency here, but for most tires, the time lag involved with building that initial slip angle means that the toe-out setup produces more grip / cornering force than the zero toe setup, even though the outside tire is going the wrong way for a split second.
That, in turn, means the car turns in much quicker/harder with toe out than the same car with zero toe. That, all else being equal, is faster.
The catch here is the weight transfer issue. Although that inside tire is producing more grip than the zero toe setup, that larger cornering force earlier in the process is going to start weight transfer a little earlier too. That means that the inside tire's larger than normal grip contribution is going to go away as weight transfer plants the outside tire. If the outside tire' slip angle is less than ideal (because of a large toe value) it will take more steer angle to get the level of grip back to where it was before weight transfer started to take over. The result is a car that turns in sharply, but then "washes out".
So the trick with toe is to time the slip angle with the weight transfer. Just enough toe produces more grip than you'd get with a zero-toe setup, but ensures that the slip angle on the outside tire is large enough so that when weight transfer lands on it, there is no loss in grip.
The sharper the corner, the more toe you can use. The slower-responding the car is, the more toe you can use. The sloppier the tire, (bias-ply vs radial) the larger the angles you need to get the same effects (both positive and negative) and the trickier it gets to time toe effects to weight transfer effects.
Rear toe works the same way, but on most cars (that don't have in-phase rear wheel steering) you don't get the benefit of the steer angle change to mitigate the outside tire's wrong-way slip angle direction. This means that running more than a little bit of rear toe is probably going to induce some degree of a turn-wash-grip cycle on the rear tires. This, however, can make the rear end very lively and can help rotate the car, especially in slaloms.
In an autocross car, toe-out (in moderation) is very much your friend.
Unfortunately, there is no good way to calculate the idea toe setting without having access to accurate tire data, so setting toe is still a cut-and-try affair. Work out front toe first, to find the point where the front end starts to wash after turn-in, then back off a little. Then do rear toe, steadily increasing until the back end gets a little bit too active.
As well, toe-out is not without a couple of tradeoffs:
- Toe can make the car very "darty", especially on bumpy surfaces and under braking. Disturbances tend to want to pull the car into the turn (unstable) vice away from the turn (stable) so the car will be constantly trying to follow bumps. Under hard braking at high speeds, this effect can be very large (I once scared the crap out of myself at a dragstrip when I forgot I had an autocross alignment on the car and it tried to swap ends in the shutdown area) This limits the effectiveness of toe on road race cars.
- Toe means that the tire is being scrubbed across the road surface to some degree. This increases tire wear, even in straight running. If this is coupled to a car with a large degree of negative static camber, the contact surface of the tire becomes a 1-2 inch wide strip on the inside edge of the tire - and that strip is being constantly scrubbed. This effect EATS tires very, very quickly!
Ackerman
With all of toe's benefits, it would be a good thing if there was a way to get the inside tire's slip angle up quickly, but not have the outside tire pointed so far in the wrong direction. This is totally doable with an asymmetric toe setup - if all the turns go the same direction.
This is unlikely to happen unless you go oval racing.
But there is a way to ensure that the steer angle on the inside tire is larger than the steer angle on the outside tire. It is called "Ackerman" or the "Ackerman angle" and all production cars have it to some degree. It is not adjustable, being a feature of the length and inclination of the steering arms on the front hubs, which on most production-based cars means modifying steel or iron castings.
But for Formula cars with bespoke hubs, playing around with Ackerman can be rewarding. The slower/tighter the course, the more Ackerman you can use. For sure, any road racing formula car (Formula Ford, Formula Vee etc) pressed into autocross service can use more Ackerman than its road racing cousin. And if you are designing a car from scratch, it is worth making Ackerman adjustable by building in a way to easily change the lengths of steering arms.
Ensure your design can easily change the amount of Ackerman in the steering angle - and go test with your tires!
Learned something?
Help keep ATW online!


