13G Turbo Install and Dyno
A 17 year old twin-turbo car that has been ridden hard over the years is going to need some maintainence, and my Stealth was no different. I was pretty sure that the stock turbos were mere minutes from exploding, and given the amount of travelling I do the last thing I wanted to happen would be for my car to start belching Spy Hunter levels of smoke out the back once a turbo finally failed.
I had that happen with a used 14B turbo I tried on the Talon, and it's just no fun.
Accordingly, I needed to replace the turbos on the car. But with what. A central creed here at Far North Racing is that "maintainence provides opportunity for upgrades" so replacing the turbos provided a window for a little more power.
But going along with that is the project goal for the car - streetable power. Whatever turbos we went with, it has to make good power throughout the street-driven rev range, and it can't require exotic fuels, meth injection, or other Weird Harolds to keep alive. Pump gas and reasonable boost levels are the order of the day. A massive, 1000 HP super-snail that doesn't spool until 5000 RPM and supports 35 PSI of boost does not meet the specifications.
So what does?
Happily, there is already a fair body of knowledge here. Visiting Jeff Lucias' Stealth Turbo Selection Guide provides flow maps for a variety of different turbos, most of which are direct bolt-ons for the Stealth.
Given our goal of streetable, Ferarri-level power, we're looking for 400-450 HP at around 16 PSI boost. That puts us at 600-675 CFM of air consumed, split over a pair of turbos, so 300-335 CFM of air per turbo. And it just so happens that there is a turbo that is nearly an exact match - the 13G.
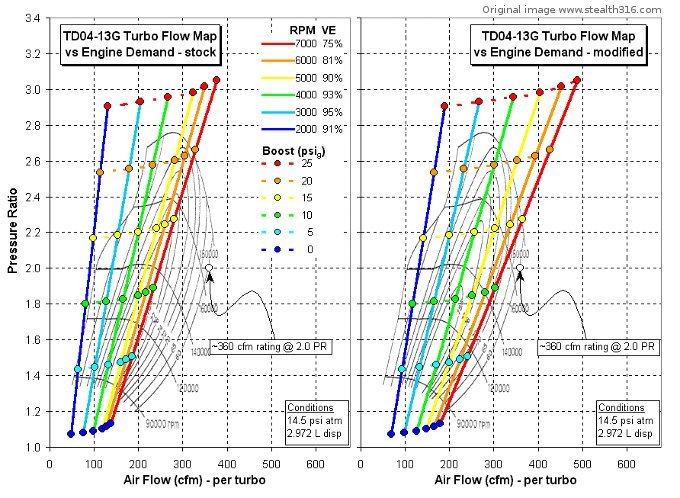
The 13G happens to have something else going for it - it was original equipment on Euro-spec 3000GTs. It fits perfectly with no oddball modifications necessary to intake piping, manifolds, exhausts, or other fluid connections. This is in keeping with the "minimize Weird Harolds" philosophy of the project as well. So it looks to be the ideal choice for an upgraded street turbo.
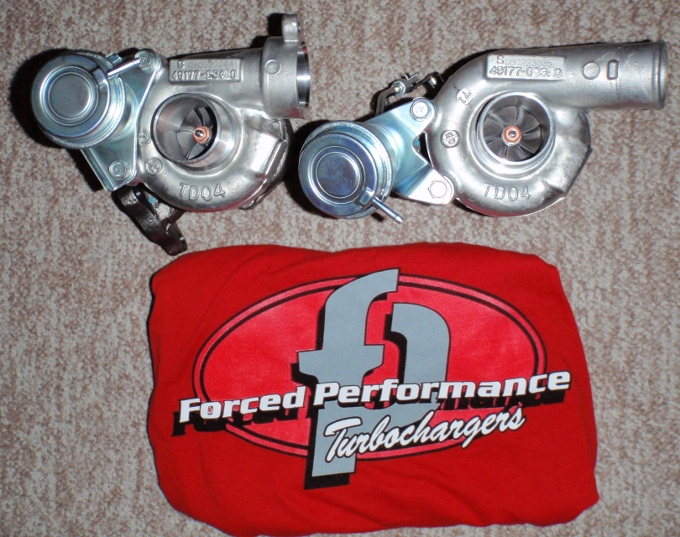
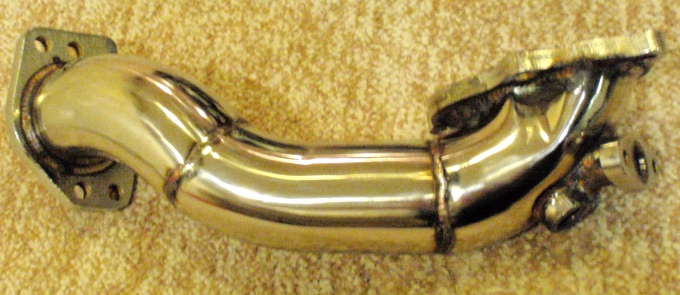
Of course, whenever we go looking for new turbos, we call the fine folks at Forced Performance as they are the only turbo supplier worth talking to. A phone call and a credit card number had a pair of brand new TD04H-13G turbos delivered to the door.
Once I had them on the bench, I took the opportunity to test the wastegate spring open pressure. By attaching a dial indicator to the tubo housing, with the indicator plunger resting on the wastegate flapper, I was able to pressurize the wastegate actuator with a Mitivac tool and see what the spring pressure value was. As you can see, the spring holds 7 PSI.
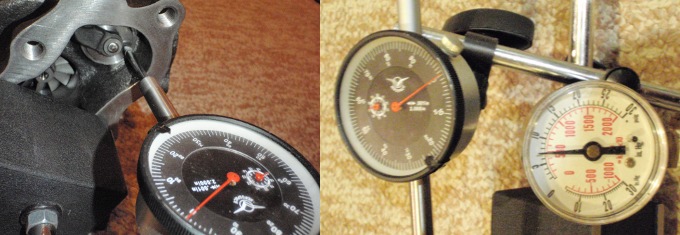
Video of the test can be seen HERE.
As far as prep goes, the only thing I did was to spray the hot sides of the turbos with Black Satin from Tech Line Coatings. I had a can handy from the Talon days and I figured if nothing else it would help prevent corrosion on the turbos and maybe reduce some underhood heat.
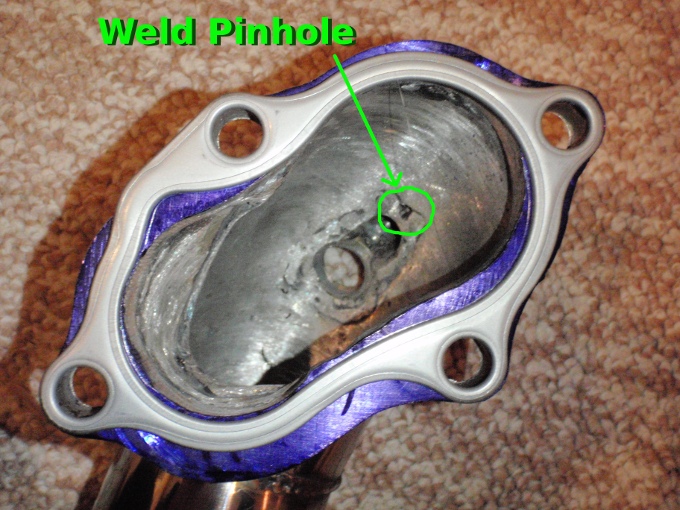
Concurrent to this, I ordered a rear O2 sensor housing from 3SX to replace the heavy and badly rusted OEM part. The price was certainly right when compared to the DN Performance parts, and unlike the DN, it can be bought separately, so I figured I'd give it a try.
Sadly, this part needed a lot of work before it was ready for use. Firstly, there was a pinhole in the EGR tube weld nearly 1/8" in diameter. Secondly, the mount flange was both badly warped and was nowhere near the correct shape on the interior channels - see here overlaid with the gasket:
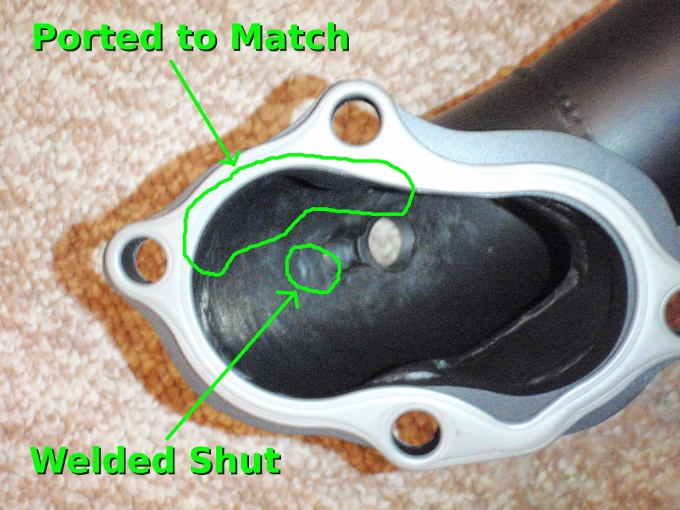
In order to fix this, I had to weld up the pinhole, gasket-match the flange (as best I could) and then resurface the flange in my mill. And then for good measure, I coated it in Black Satin and wrapped it in heat wrap.
With that done, it was off to Magnus Motorsports to get the turbos installed and run the car on the dyno.
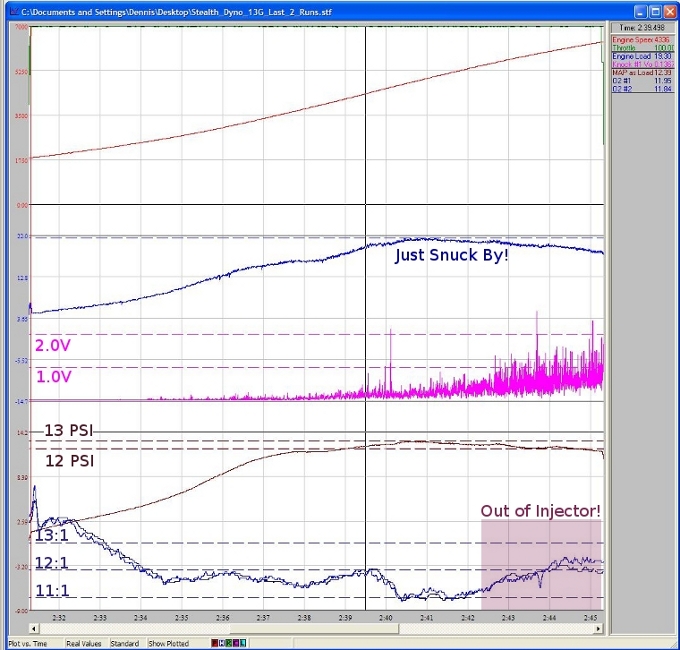
The turbo install went off without a hitch - they are, after all, direct replacements - but the dyno test proved interesting. I am using the AEM EMS in MAF mode, keeping the OEM Karman Vortex MAF sensor. The AEM is not well suited to this kind of MAF. Oh, it works well enough, but it doesn't appear to use the full range of the sensor. Furthermore, it treats the sensor as a volume sensor rather than a mass sensor - meaning the airflow still has to be corrected for air temp to get mass. Notwithstanding, it has worked fine up until now. But on the dyno, as we started to tune the boost controller, we ran out of flow capacity on the MAF, which limited the amount of boost that could be run.
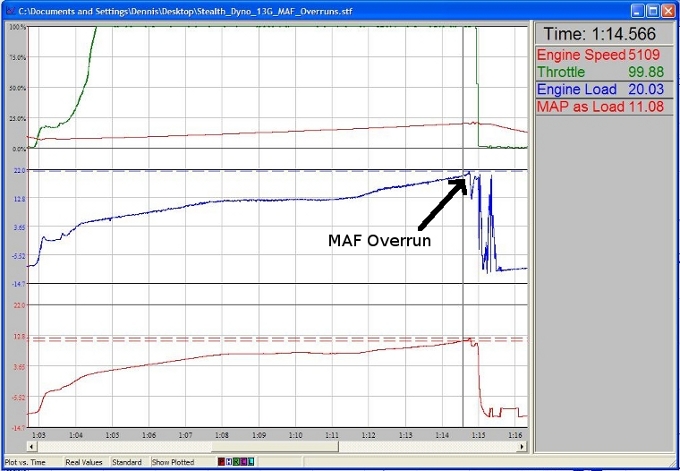
Some of the early runs - which had to be aborted when MAF overrun activated fuel cut - were very interesting, as they were on their way to meeting the power target with no other mods done to the car. But with the MAF being what it is, this was the most boost we could squeak through:


All things considered, this is a nice power increase with plenty of headroom left in the car. All that is really needed are slightly larger injectors and the fuel pump to feed them, and conversion of the car to speed/density mode (to eliminate the MAF overrun problem). With that done, the power target is completely reachable - and with full reliability and a cat converter still in the car.